


3×9 Subway, a Tiled Shower Ceiling, and 5×20 Herringbone Across a Strathcona Luxury Renovation
The Strathcona river valley edge is one of central Edmonton’s most established and architecturally distinctive housing markets, with a stock of luxury single-family homes sitting on lots that border the river valley ravine system south of the High Level Bridge. Renovations on this stock are summer-season major works where the builder coordinates multiple trades across kitchen, primary ensuite, main bathroom, entryway, and living-room scopes in a single contract. On this Strathcona river valley luxury renovation The Tile Experts ran a multi-room tile scope spanning every one of those zones: 3 by 9 subway on every kitchen wall, 3 by 6 subway across every surface of the ensuite shower including the ceiling and bench, two different mosaic floors in the bathrooms, 5 by 20 plank tile in a herringbone pattern at the back entrance, and a mosaic fireplace surround.
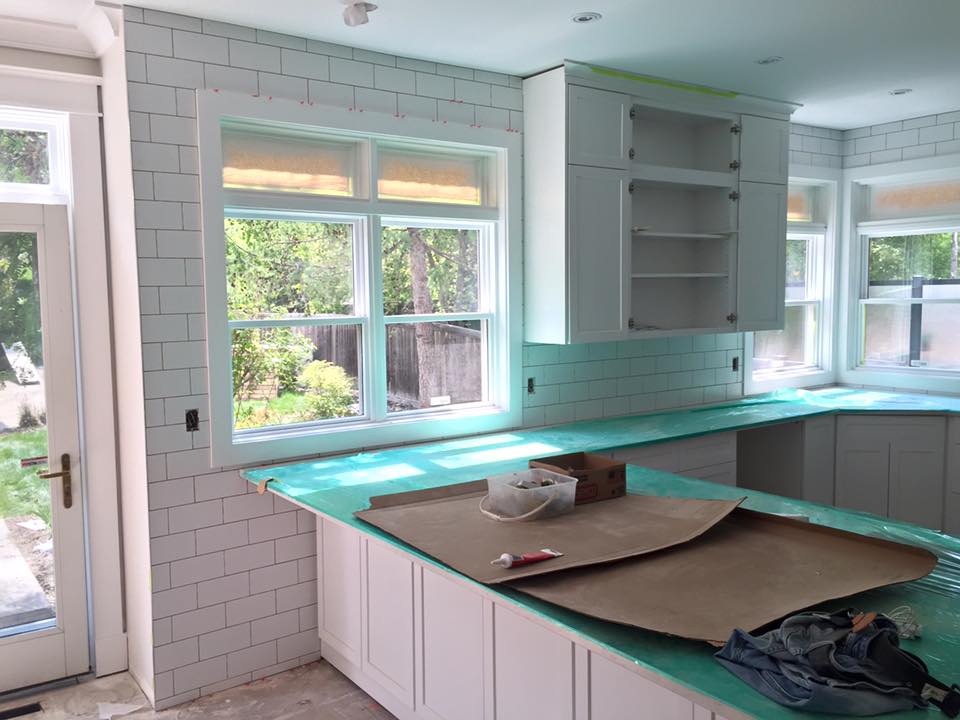
3×9 Subway on the Kitchen Walls
The kitchen on this Strathcona renovation departed from the conventional 3 by 6 subway by stepping up to a 3 by 9 format on every kitchen wall. What changes at 3 by 9: the 3 by 9 reads as elongated and more architectural than the classic 3 by 6, with a longer horizontal proportion that draws the eye across the wall and gives the kitchen a more contemporary feeling than a 3 by 6 backsplash. Why on every kitchen wall: the spec called for the 3 by 9 to wrap the entire kitchen, not just the backsplash zone above the counter. This is a luxury-home design move that turns the kitchen into a tile-lined room rather than a kitchen with a backsplash. The continuous tile reading pulls the room together as one design surface. The bond coat: the kitchen walls were set with VersaBond Mortar, a polymer-modified portland-cement thinset chosen here over the conventional ReliaBond mastic because the tile coverage across the kitchen walls includes both dry-zone and humidity-exposed surfaces. VersaBond carries the bond performance across both environments. The grout: joints were finished with Mapei FlexColor Grout, the pre-mixed polymer grout that holds its colour reading across years of kitchen moisture cycling and bonds tighter to the tile edge than a standard cement grout. The FlexColor chemistry is the right specification for a kitchen wall that will see daily cleaning and cooking-zone exposure.
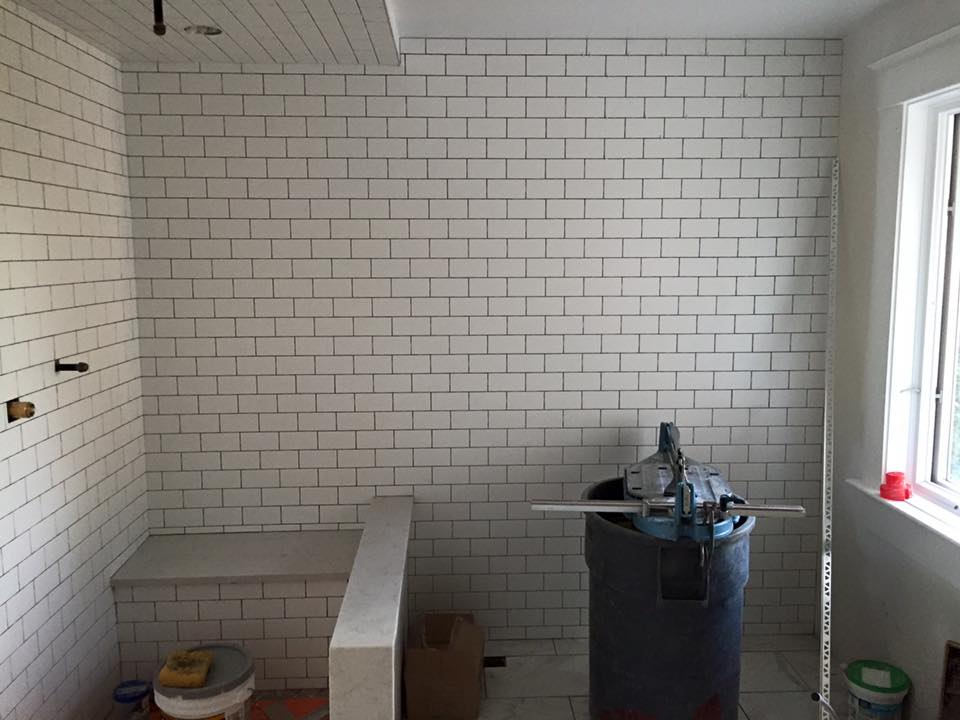
3×6 Subway Across Every Surface of the Ensuite Shower: Walls, Ceiling, Pony Wall, Bench, Back Wall
The ensuite shower on this build is the most comprehensive subway-tile shower scope a residential crew can quote. The 3 by 6 subway runs across every surface inside the shower enclosure: the side walls, the ceiling, the pony wall (the half-height wall separating the shower from the rest of the bathroom), the bench, and the back wall of the bathroom adjacent to the shower. Why tile the shower ceiling: a tiled shower ceiling is the detail that separates a luxury custom shower from a builder-grade one. A drywall ceiling above a shower will eventually show moisture damage from steam exposure regardless of how good the bath fan is, while a tiled ceiling resists the steam environment indefinitely. Beyond performance, a tiled ceiling gives the shower a continuous-surface reading where every plane the eye lands on reads as the same material. Why tile the pony wall and bench: the pony wall is a vertical interior surface that defines the shower entry, and the bench is a horizontal sit-down surface that demands waterproofing across every face. Both surfaces sit in the wet zone and both demand full subway-tile coverage with bonded waterproofing behind. The bond coat: every surface in the shower was set with VersaBond Mortar, with the polymer-modified portland-cement chemistry that the continuous wet-zone environment demands. The grout: all 3 by 6 joints across the shower were grouted with Mapei FlexColor Grout, with the pre-mixed chemistry that bonds tighter to the tile edge in wet exposure than a batch-mixed cement grout would.

Two Different Mosaic Floors: Ensuite Shower and Main Bathroom
The two bathroom floors on this build use two slightly different mosaic specifications, chosen to differentiate the two rooms while keeping both in the mosaic-floor family. The ensuite shower floor: a mosaic floor inside the shower enclosure, which is the conventional luxury-shower spec because mosaic on a shower floor wraps the drain and slopes correctly without the bulk cuts a larger-format tile would require. The smaller individual tile size lets the mosaic conform to the slope toward the drain without producing the awkward lippage that a 12 by 12 would on the same slope. The main bathroom floor: a slightly different mosaic running across the main bathroom floor outside the shower enclosure. Why two different mosaics rather than one: the ensuite shower floor sits inside an enclosed wet-zone with continuous water exposure, while the main bathroom floor sits in a moisture-cycling environment but not in standing water. Using two slightly different mosaics lets each floor get the right specification for its environment while keeping both rooms in the same design language. The bond coat: VersaBond. The main bathroom floor grout: Prism Grout, the calcium-aluminate cement grout chosen for its colour stability across years of cleaning.
5×20 Herringbone at the Back Entrance
The back entrance on this Strathcona build is one of the most distinctive single-room tile scopes in the project: a 5 by 20 plank tile installed in a herringbone pattern. What the format means: a 5 by 20 is a plank-format porcelain that reads like a wood plank in tile, and the herringbone pattern (every tile rotated 90 degrees relative to its neighbours, creating a zigzag V-pattern across the floor) gives the room a strong directional visual energy that a straight lay would not. Why this is the right move for a back entrance: a back entrance is the room family members and pets pass through dozens of times a day, often with wet boots, dropped groceries, and seasonal grit. A 5 by 20 porcelain in herringbone reads as a deliberate design surface (turning a transition room into a design moment) and performs durably under the actual use pattern (porcelain is the most durable tiled floor material available, and the herringbone visually camouflages the inevitable wear pattern in high-traffic zones). The install discipline: a herringbone pattern with a 5 by 20 plank is harder to install than a straight lay because every joint has to land at a precise 90-degree intersection with its neighbour, the layout has to start from a centred reference, and the perimeter cuts have to be planned across the herringbone rhythm so they read as deliberate rather than incidental. The bond coat: VersaBond Mortar. The grout: Prism Grout, with the floor-rated calcium-aluminate chemistry that handles the back-entrance moisture and traction-grit exposure.
The Mosaic Fireplace Surround
The fireplace surround on this build was tiled in a small mosaic pattern set with ReliaBond Tile Adhesive. Why a mosaic on the fireplace: the fireplace is the living room’s focal point, and a mosaic surround carries pattern, texture, and material mix that lifts the fireplace from a structural opening into a designed feature. The small mosaic format also works around the fireplace opening geometry better than a larger-format tile because the smaller individual tiles produce more graceful cuts at the opening edge. Why ReliaBond on the fireplace: the fireplace surround is a vertical dry-zone application with intermittent heat exposure rather than continuous moisture. ReliaBond’s Type 1 organic mastic chemistry is engineered for that environment, with the grab and open time that the slower-paced mosaic install workflow demands. The grout: the fireplace mosaic joints were grouted with Prism Grout, with the colour stability that holds across years of heat cycling.
Planning a multi-room luxury renovation with custom shower scope, mosaic floors, herringbone plank tile, or coordinated kitchen and bathroom tile work in Strathcona, the river valley, or anywhere in central Edmonton? Call The Tile Experts at 587-333-9800 or request a quote.
Strathcona Luxury Renovation FAQ
How much does a multi-room luxury tile renovation with full ensuite shower scope, mosaic floors, and herringbone back entrance cost in Strathcona?
For a project of this scope (3 by 9 subway across every kitchen wall, 3 by 6 subway across every ensuite shower surface including ceiling and bench, two different mosaic bathroom floors, 5 by 20 plank in herringbone at the back entrance, mosaic fireplace surround, full bond coat and grout specification matched per surface), plan on 28,000 to 52,000 dollars in tile-scope labour and material, with total cost driven primarily by ensuite shower square footage and the herringbone back-entrance dimensions.
Why tile the shower ceiling in a luxury build?
A drywall ceiling above a shower will eventually show moisture damage from steam exposure regardless of bath fan performance, while a tiled ceiling resists the steam environment indefinitely. A tiled ceiling also gives the shower a continuous-surface reading where every plane the eye lands on is the same material.
Why install 5×20 plank tile in a herringbone pattern rather than a straight lay?
A herringbone pattern with plank tile produces strong directional visual energy and visually camouflages the inevitable wear pattern in high-traffic zones like a back entrance. The pattern reads as a deliberate design choice rather than a default install. See our floor tile installation service.

Tile Installation in Strathcona and Central Edmonton
The Strathcona river valley edge runs south of the High Level Bridge along the ravine, with neighbours in Garneau, Old Strathcona, Queen Alexandra, Mill Creek Ravine, and the broader central river-valley housing belt. Luxury multi-room renovations combining custom showers with tiled ceilings, mosaic bathroom floors, herringbone plank entries, and coordinated kitchen tile scopes are some of the most common high-value projects in this established central housing market. The Tile Experts install bathrooms, kitchens, floors, custom showers, fireplaces, and feature walls across Strathcona, Garneau, Old Strathcona, Queen Alexandra, Mill Creek, and the rest of central Edmonton, plus the full capital region. Contact us or call 587-333-9800 for a free in-home walkthrough.
More Projects in Strathcona River Valley and the Edmonton Area
Explore more recent tile installation work by The Tile Experts.
