


Screwing Down the Subfloor and Laying 12×12 in a Diamond Pattern in South Edmonton
South Edmonton covers a broad band of established residential neighbourhoods running south of Whyte Avenue and north of Ellerslie Road, with a housing stock that ranges from 1950s post-war bungalows through 1990s split-levels and into the early-2000s infill builds. Floor tile renovations in this established stock often start with substrate prep work that a newer home would not require, because the existing subfloor has settled across decades and the original fasteners have backed off. On this south Edmonton renovation the prep stage was the headline scope: the entire plywood subfloor under the tile zone was re-screwed before any tile went down, then the homeowner-selected 12 by 12 porcelain was laid in a diamond pattern with VersaBond and finished with Prism Grout.
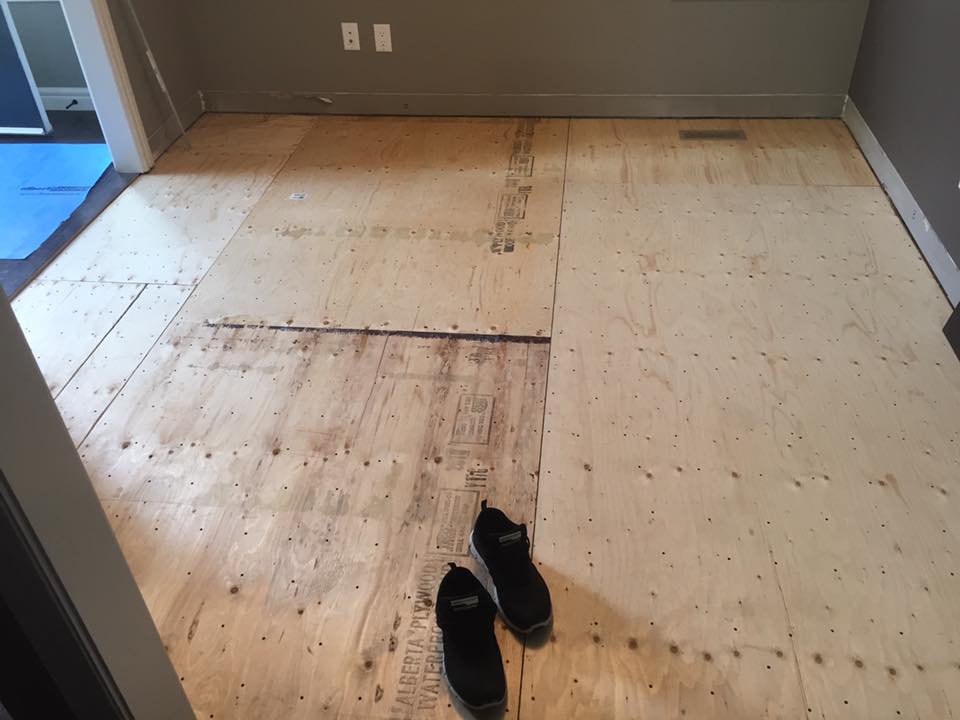
Why Screwing Down the Subfloor Is the Most Important Prep Step on an Established Home
The first stage of this south Edmonton renovation was not laying tile; it was systematically driving screws down through the existing plywood subfloor into the joists below to eliminate any subfloor movement before the tile went on top. Why this matters: the original construction in an older home typically used nails to fasten the subfloor to the joists, and nails back out across decades of seasonal cycling. A subfloor that moves under foot traffic transmits that movement into the bond coat and then into the tile and grout joints. Over time, that movement reads as popped tiles (tile that has lost adhesion and lifts off the bond coat) and as cracked grout joints (grout that has fatigued under repeated micro-flex). The screw-down discipline: the prep crew systematically walks the subfloor with a screw gun, sinking screws every 6 to 8 inches along every joist line. The pattern catches every spot where the original nails have backed off and locks the subfloor tight to the joists so it cannot move under load. What this prevents: the most expensive failure mode in residential floor tile is a popped-tile field that requires removal and replacement of the affected tiles, often spreading well beyond the originally-popped zone because the adjacent tiles are also at risk. A 200-dollar subfloor screw-down prep stage at the front of the project prevents a 2000-dollar tile-replacement scope two years later. Why most contractors skip this step: the screw-down adds half a day to the project schedule and is invisible to the homeowner after the tile goes on top, which makes it easy to skip when a quote is competing on price. We do not skip it, because we get the warranty call when the floor pops.
The 12×12 in a Diamond Pattern
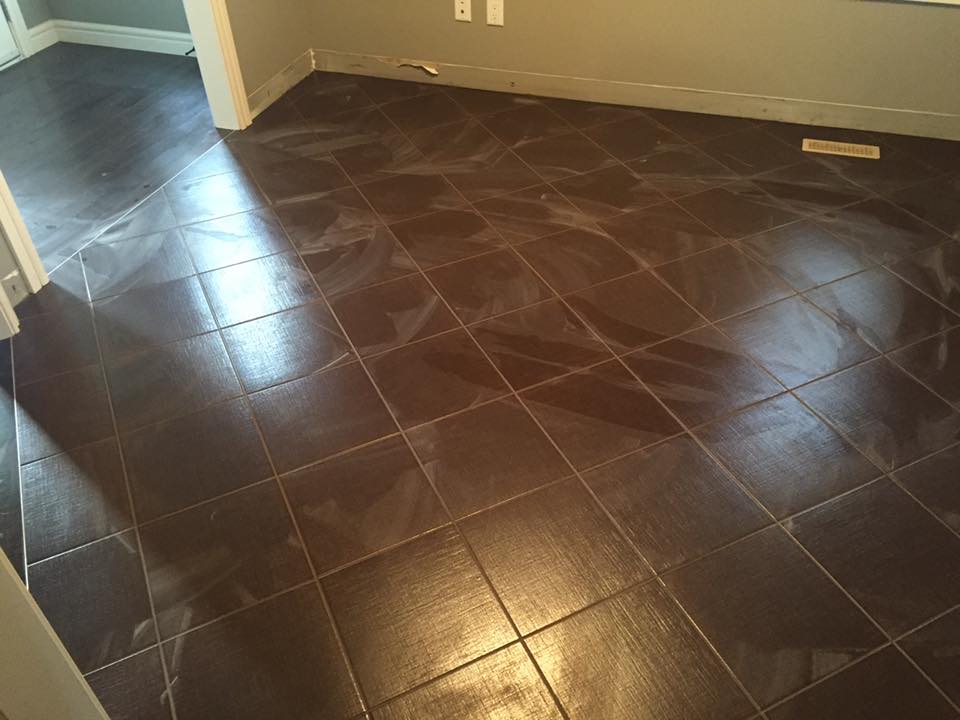
The homeowner on this renovation specified a 12 by 12 porcelain laid in a diamond pattern rather than a conventional straight lay. What a diamond pattern means: the 12 by 12 tile is rotated 45 degrees relative to the walls of the room, so each tile reads as a diamond rather than a square, with the corners pointing toward the walls. Why a diamond pattern: a diamond layout gives a small or medium-sized room a sense of greater visual scale because the diagonal lines pull the eye across the room rather than letting the grid emphasize the room’s actual dimensions. The pattern reads as more design-forward than a straight lay, and on a renovation where the homeowner wants the new floor to read as a deliberate design upgrade (rather than a like-for-like replacement), the diamond is the move that signals the investment. The install discipline: a diamond lay is harder to install than a straight lay because every perimeter tile has to be cut on a diagonal, the layout has to start from a centred reference point rather than from a wall, and any irregularity in the room geometry shows up on the perimeter cuts. The setter has to dry-lay the field first to confirm the centred reference works in both axes, then commit to the bond coat. The bond coat: the field was set with VersaBond Mortar, the polymer-modified portland-cement thinset that matches the residential floor application. The bond strength carries the 12 by 12 across years of foot traffic, and the polymer modification provides the flexibility the substrate cycling demands.

Why the Diamond Pattern Demands a Centred Layout Start
A diamond pattern install starts from a centred reference point in the room, which is fundamentally different from a straight lay that starts from a wall. Why centred: the diamond grid is rotated 45 degrees, so any irregularity in the room geometry (a wall that is not perfectly square to its opposite wall, a doorway that lands at an awkward measurement, a kitchen island that intrudes into the field) shows up on the perimeter cuts. Starting from a centred reference point distributes the irregularity evenly across all four walls, which makes the perimeter cuts read as proportional. Starting from a wall would push the entire irregularity onto the opposite wall, where it would show up as a series of awkward cut tiles. The dry-lay confirmation: the setter dry-lays the field across the room before committing to any bond coat, walking the layout and confirming that the centred reference produces clean perimeter cuts in every direction. If the dry-lay shows a sliver cut at any wall that would read as a layout defect, the centred reference is shifted by a half-tile or rotated slightly to land the cuts on better proportions. This is layout craft that takes time, and a setter quoting diamond-pattern work at straight-lay rates is going to either lose money on the job or skip the dry-lay and produce a floor with awkward perimeter cuts.
Prism Grout on Every Joint
The diamond-pattern field was grouted with Prism Grout. Why Prism on a residential floor: Prism is a stain-resistant calcium-aluminate cement grout engineered specifically for floor applications where daily traffic, moisture from mopping, and cleaning-product exposure demand a grout that holds its colour reading across years. The calcium-aluminate chemistry resists efflorescence and bonds tighter into the joint than a standard cement grout. Why grout matters more on a diamond layout: the diamond pattern emphasizes the grid lines because the eye follows them diagonally across the room. Grout that loses colour or discolours unevenly reads as a defect on a diamond floor faster than it would on a straight lay, because the diagonal grout lines are the visual structure of the room. Prism’s colour stability across years of cleaning is the property that protects the diamond layout from looking tired before the tile itself shows wear.
Planning a floor tile renovation with subfloor prep and a diamond-pattern layout in south Edmonton? Call The Tile Experts at 587-333-9800 or request a quote.
South Edmonton Renovation FAQ
How much does a 12×12 diamond-pattern floor renovation with full subfloor screw-down cost in south Edmonton?
For a project of this scope (full subfloor re-screw to eliminate movement, 12 by 12 porcelain in a diamond pattern with centred layout reference, VersaBond bond coat, full Prism grout finish), plan on 9 to 14 dollars per square foot in tile-scope labour and material, with the subfloor prep adding a fixed prep-day cost regardless of total floor square footage.
Why screw down the subfloor before tiling on a renovation?
The original nails fastening the subfloor to the joists back out across decades of seasonal cycling, and a subfloor that moves under foot traffic transmits movement into the bond coat and grout joints. Over time that movement reads as popped tiles and cracked grout. Re-screwing the subfloor locks it tight to the joists and prevents the most expensive residential floor failure mode.
Why does a diamond layout require a centred starting reference?
The diamond grid is rotated 45 degrees, so any irregularity in the room geometry shows up on the perimeter cuts. Starting from a centred reference distributes the irregularity evenly across all four walls, which makes the perimeter cuts read as proportional. Starting from a wall would push the irregularity onto the opposite wall as awkward cut tiles. See our floor tile installation service.
Tile Installation in South Edmonton
South Edmonton runs south of Whyte Avenue and covers a band of established residential neighbourhoods including Strathcona, Garneau, Ritchie, Hazeldean, Bonnie Doon, King Edward Park, and continues south through the older bungalow stock toward Ellerslie. Floor tile renovations with subfloor prep, diamond and offset layouts, and design-upgrade specifications are some of the most common projects in this established housing market that is now well into its second and third renovation cycles. The Tile Experts install bathrooms, kitchens, floors, custom showers, fireplaces, and feature walls across south Edmonton and the rest of the established residential core, plus the full capital region. Contact us or call 587-333-9800 for a free in-home walkthrough.
More Projects in South and the Edmonton Area
Explore more recent tile installation work by The Tile Experts.
